I am so excited to enroll in Udacity’s flagship program: self-driving car!
This is term one, which includes 5 projects and 24 lessons (from 2.16 to 5.29):
- Lane-Finding Project (due 2.25)
- Traffic Sign Classifier Project (3.27)
- Behavioral Cloning Project (4.17)
- Advanced Lane Finding Project(5.1)
- Vehicle Tracking Project (5.15)
C++ will be used in term 2 and term 3, with topics in sensor fusion and path planning.
For a quick glance, I notice quite a few overlapping contents with other nanodegree programs. As a result of the overlap, so far I already finish 2/3 of the total 24 lessons.
- 3 lessons are exactly the same from the free udacity course (intro to machine learning) by Sebastian.
- 5 lessons are career services (resume, link-in, github, interview), pretty much the same with MLND.
- 7 lessons are deep learning basis. Actually, the original TensorFlow Deep learning by Vincent has just been overhauled.
So after subtracting the obove courses, the pure, authentic lessons that directly teach self-driving car are only 9. Obvious, these courses are never enough to build a self-driving car. These courses are just a window to a new world. Be prepared and actively learn much more!
Available sources
Instructor:
David Silver Princeton graduate in CS (2004), previously worked on automous car at Ford for 3 months.
Ryan Keenan recovering astrophysicist (2007-2015)
By the way, the team in CMU to lead in DARPA Grand Challenge (1st in 2004, 2nd in 2005 due to home-assembled hardware, 1st in 2007) was lead by Whittaker, who has all his degrees in Civil Engineering in 1970s. He said,
If you haven’t done everything, you haven’t done a thing.
Your mentor, Pratheerth Padman, Martijn de Boer
- Check in with you weekly to make sure that you are on track
- Help you to set learning goals
- Guide you to supplementary resources when you get stuck
- Respond to any questions you have about the program.
Self-driving car is taught by both approaches:
- Robotics
- Deep Learning
A free Udacity course, Introduction to Computer Vision.
Setup
Environment setup. The problem is opencv3 only compatible with python 3.5 while the latest python is 3.6. So I build a new env for this project.
conda create --name=car python=3.5 anaconda
pip install pillow
source activate car
conda install -c menpo opencv3=3.1.0
pip install moviepy

python
import imageio
imageio.plugins.ffmpeg.download()
Read a image file has many ways:
scipy.ndimage.imread()# rgb formatmatplotlib.image.imread()# rgb formatcv2.imread()# bgr format
Be careful if you use cv2 to read image.
Finding Lane lines
5 region masking
triangle mask
ysize, xsize = image.shape[0:2] # size is (y,x) format
region_select = np.copy(image)
left_bottom = [0, 539] # point is (x,y) format
right_bottom = [900, 300]
apex = [400, 0]

# Fit lines (y=Ax+B) to identify the  3 sided region of interest
# np.polyfit() returns the coefficients [A, B] of the fit
fit_left = np.polyfit((left_bottom[0], apex[0]), (left_bottom[1], apex[1]), 1)
fit_right = np.polyfit((right_bottom[0], apex[0]), (right_bottom[1], apex[1]), 1)
fit_bottom = np.polyfit((left_bottom[0], right_bottom[0]), (left_bottom[1], right_bottom[1]), 1)

# Find the region inside the lines
XX, YY = np.meshgrid(np.arange(0, xsize), np.arange(0, ysize))
region_thresholds = (YY > (XX*fit_left[0] + fit_left[1])) &  (YY > (XX*fit_right[0] + fit_right[1])) & (YY < (XX*fit_bottom[0] + fit_bottom[1]))

# Color pixels red which are inside the region of interest
region_select[region_thresholds] = [255, 0, 0]
10 Canny Edge detection
John F. Canny developed this algorithm in 1986.
# Define a kernel size for Gaussian smoothing / blurring
kernel_size = 5 # Must be an odd number (3, 5, 7...)
blur_gray = cv2.GaussianBlur(gray,(kernel_size, kernel_size),0)
# Define our parameters for Canny and run it
low_threshold = 50
high_threshold = 100
edges = cv2.Canny(blur_gray, low_threshold, high_threshold)
13 Hough Transform
In 1962, Paul Hough devised a method for representing lines in parameter space, which is called Hough space.
y = mx + b
Usually, we use (x,y) space, but Hough space is (m,b) or )
# Define the Hough transform parameters
# Make a blank the same size as our image to draw on
rho = 1
theta = np.pi/180
threshold = 1
min_line_length = 10
max_line_gap = 1
line_image = np.zeros_like(image) #creating a blank to draw lines on
# Run Hough on edge detected image
lines = cv2.HoughLinesP(edges, rho, theta, threshold, np.array([]),min_line_length, max_line_gap)
# Iterate over the output "lines" and draw lines on the blank
for line in lines:
    for x1,y1,x2,y2 in line:
        cv2.line(line_image,(x1,y1),(x2,y2),(255,0,0),10)
documentation link:
project pipeline
My pipeline consisted of following steps:
| step | Action | code functions |
|---|---|---|
| 1 | convert image file to 3D np array | cv2.imread |
| 2 | convert image to grayscale | cv2.cvtColor |
| 3 | smooth image to suppress noise | cv2.GaussianBlur |
| 4 | get edges by canny’s gradient method | cv2.Canny |
| 5 | propose a mask region | cv2.fillPoly |
| 6 | retain masked edges | cv2.bitwise_and |
| 7 | probalistic hough transform | cv2.HoughLinesP |
| 8 | draw lines on a blank image | cv2.line |
| 9 | merge original image with lines | cv2.addWeighted |
The highlighted part is key steps.
The corresponding result for each step is:
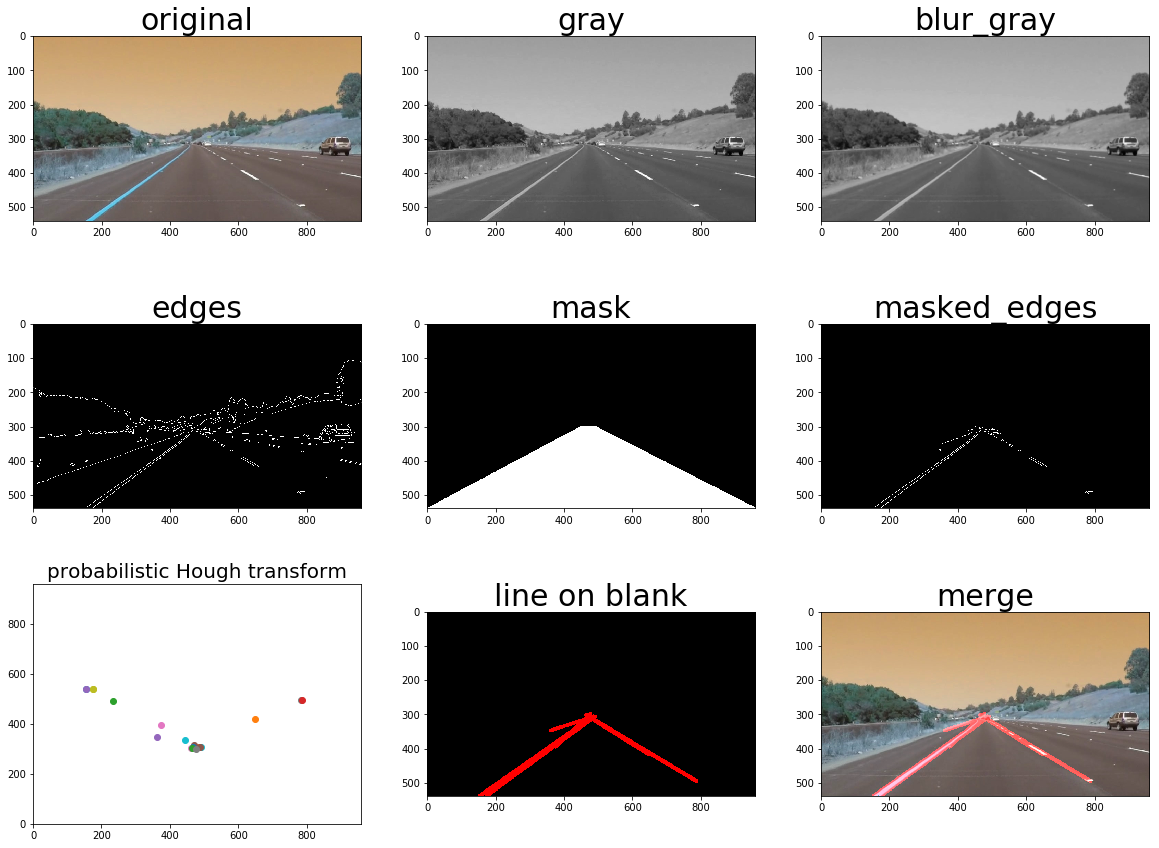
Note that the Hough line points are drawn inconsistent with the normal mathematical coordinates.
I used reviewer’s suggestions to tune the parameters of
cv2.HoughLinesP() and get much better results. The problem is still false positive. The idea I have is to use a queue to store the point positions that are closest to car (max of y value), and use this to pick the “right points”. Then np.polyfit() the points and plot 2 nice lines.for video
from moviepy.editor import VideoFileClip
from IPython.display import HTML
white_output = 'white.mp4'
clip1 = VideoFileClip("solidWhiteRight.mp4")
white_clip = clip1.fl_image(process_image)
%time white_clip.write_videofile(white_output, audio=False)
HTML("""<video width="960" height="540" controls><source src="{0}"></video>""".format(white_output))
where
process_image is a user-define function that process a 3-channel image and output an image with lines drawn on.